|
During the installation of the euro headlight switch, there are some things
to consider before you put the dash back together. First, is the issue of the deactivation of the Daytime Running Lights
(DRL) feature; can be easily done with the headlight switch out. Second, is the optional use of the fog lights
when just the parking light are in use. These simple and basic modifications are fully reversible if the owner of the
vehicle does not like the current settings.
DRL Removal
1.) With the headlight switch not connected to the wiring harness, locate pin #15 on the
switch. When looking at the back of the switch, it's the very top right connector pin.
2.) Take some standard electrical tape, cut to the correct size / width, and place over
pin #15 on the switch. This is the simplest and non-destructive way to deactivate the DRLs; the electrical tape does
not let the switch connect with power wire (yellow wire only) of the DRLs.
3.) Install switch with tape covering pin and connect to wiring harness; at this time,
start car to verify that the DRLs are deactivated.
4.) If continuing to install headlight switch, please refer back to Euro Headlight Switch installation procedure.
- Average Time: 5+
mintues (additional)
- Scheduled
Maintenance: none - personal customization
- Price of Materials: electrical
tape ~ $5.00
- Written by Erik Melander
Fog Light Jumper
Modification
1.) After completing headlight switch installation, head under the steering wheel
and remove the fuse / relay cover panel.
2.) Locate relay position #10 on the relay panel; the OEM relay has 110
printed on it. Pull gentley out and remove from panel.
3.) Make or buy fog light wiring jumpers and install the "C" jumper in the
top right and bottom right of the relay contacts; install the "bridge" or "Z" jumper in the left and right middle relay contacts.
Be sure to use electrical tape if any of the jumpers is close to touching or grounding out to another relay.
4.) After jumpers have been installed, start car and varify use of fog light independant
of the headlights. If fog lights do not work in the parking light position, shut off car and double check connection
on the relay jumpers.
5.) If working properly, re-install fuse panel.
- Average Time: 20+
mintues (additional)
- Scheduled
Maintenance: none - personal customization
- Price of Materials: fog light jumpers ~ $5.00
or
copper wire ~ $1.00
electrical connectors ~ $1.00
- Written by Erik Melander
|
 |
|
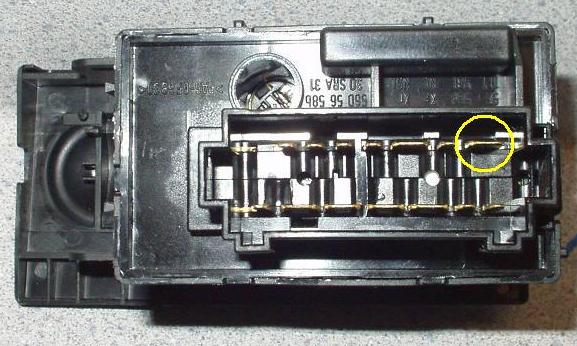
Shown highlighted is connection pin #15 (looking at the swtich from the
backside); that pins mounts to the yellow power wire for the DRLs on the headlight switch wiring harness. Place the
tape on both side of the pin so that the DRL circuit does not close.
|
|
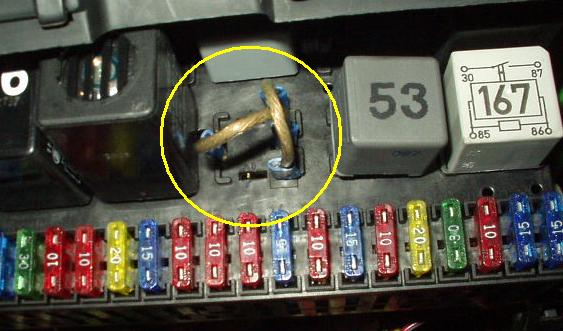
Shown above is the homemade wire jumpers installed; notice the installed
positions, the horizontal wire connects the two middle pins and the vertical connects the far right top / bottom pins.
Be sure to insulate the connections so that they DO NOT ground / short out; it can cause an electrical fire. Once jumpers
are installed, the fog light option during parking lights will work on the euro switch as shown below.
|
|