There are many way to install such an A-pillar gauge pod; this is the way I pursued for a flush and seemless finish.
1.) Locate the A-pillar trim from the vehicle or donor vehicle. You'll need to gently pull away the
seat beat trim cover, and let hang with the seat belt still through it. Unscrew the Phillips screw and gentley pull
out and away from the A-pillar frame so that the trim retaining fasteners come out. Remove trim from vehicle.
2.) With the A-pillar trim pieve out, test fit the gauge pod. If test fit is poor and sloopy, use a heat
gun, boiling water or daytime sun to mold and shape the pod to the trim. Much time will be needed to have the pod sit
correctly flush is that is the desired outcome.
3.) Also, during testing fitting, take trim and pod and test fit in vehicle. Place and make a scoring mark
on the trim where you want to the gauge pod to sit in relation so that you'll be comfortable seeing your future gauges.
4..) Once fitting is satisfactory, trim any obvious excess plastic from the gauge pod.
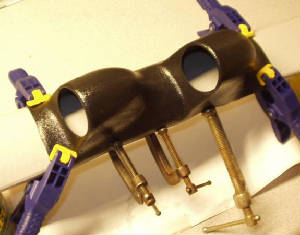
5.) Secure the pod to the trim by either the use of screws / rivets... or any type of plastic / polyurethane glue.
If using glue, sand and clean off all oils and residues from the trim piece and pod. Apply glue generously, and make
an entire bead around the edge of the pod. Use clamps to ensure a secure fit and bondage. Let trim sit and cure
appropriately outlined by the directions of the glue.
6.) Cut and trim out the backside of the A-pillar trim piece to allow wiring through. Using a high-speed
dremel works great for cutting out wiring holes.
7.) Install newly modified A-pillar trim and gauge pod with wanted gauges. Careful not to over-bend or apply
unwanted strain or stress; it can warp the finish of the pod and crack the adhesive that was applied.
8.) Gently push the retaining fasteners into the A-pillar frame and screw in the Phillips screw. Re-install
seat belt trim cover.